Friday, April 26, 2024

Chalkboard Card


Hello! Welcome back to my blog. Today's project is a throwback for me. Remember when this phrase became a trend? There are different versions of this phrase. I am also revisiting an old technique, the chalkboard technique which became a trend in crafting too. I remember that this is the technique I used on my first project as a design team member.

My rubber stamp is from Hampton Arts. I used the Stamp-a-ma-Jig to help me in centering the sentiment on a 4 1/4" x 5 1/2" Grafix Dura-Bright black paper. 

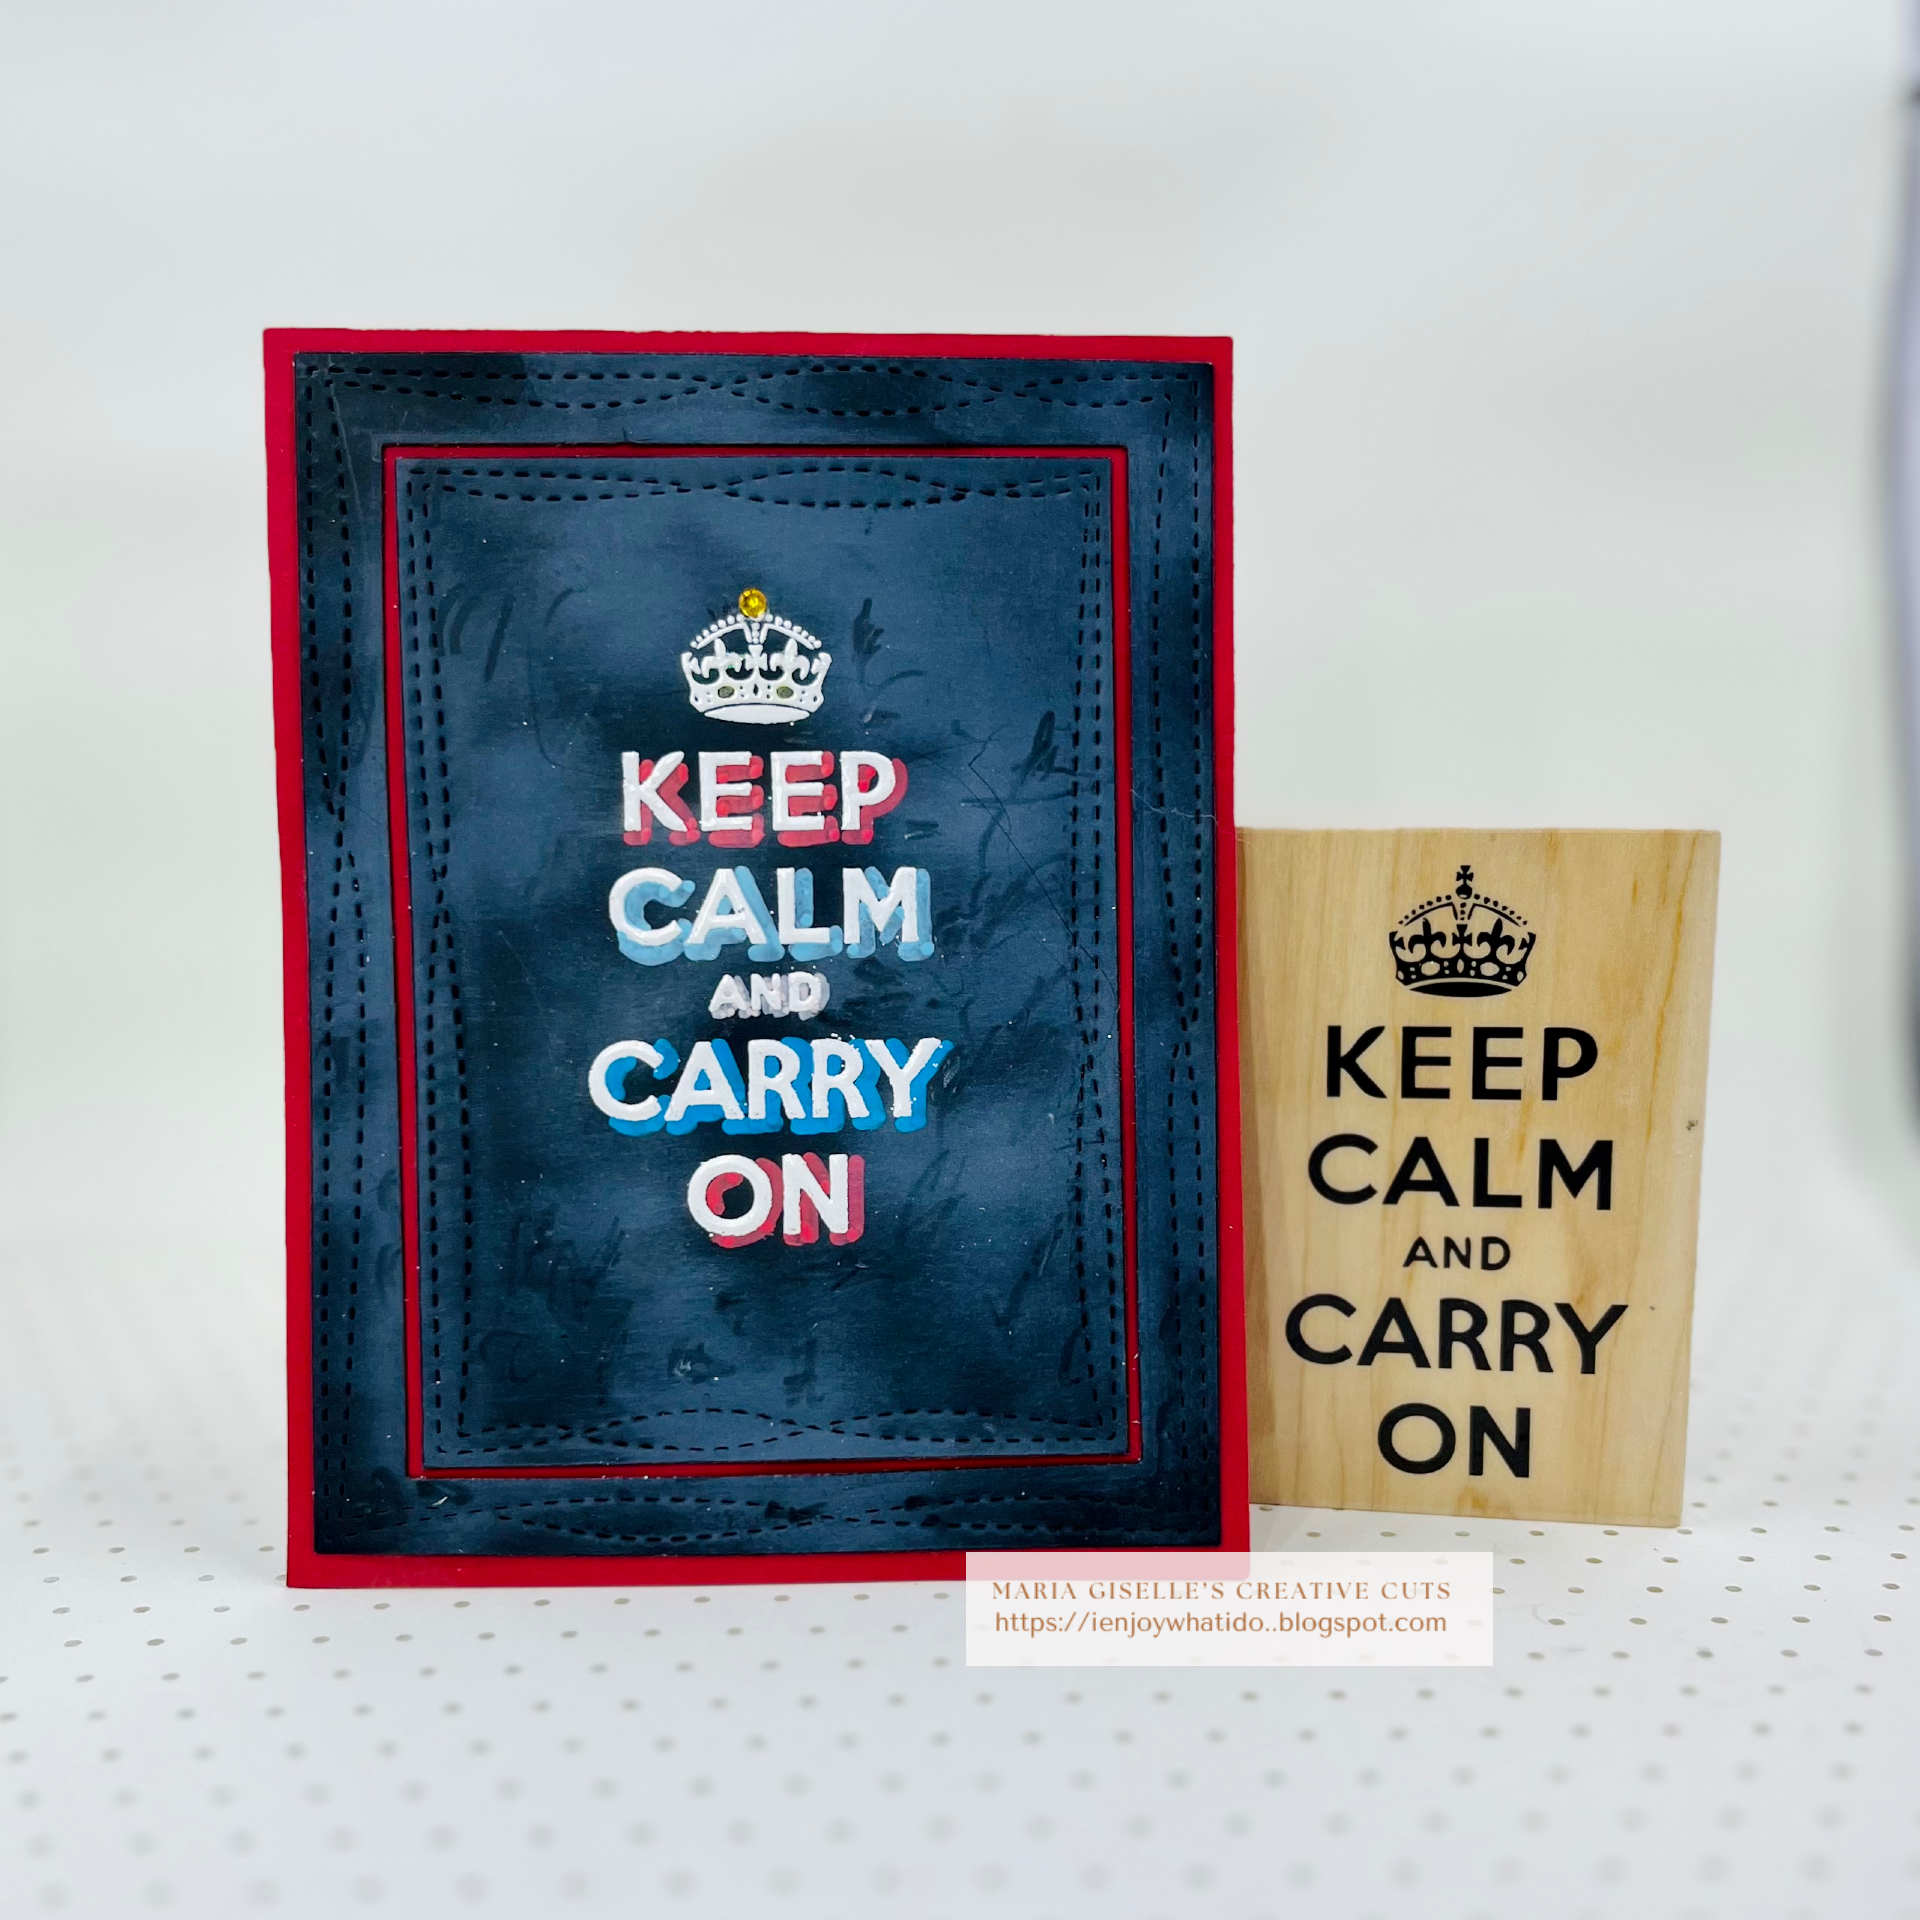
I prepared the surface with an anti-static powder tool. I stamped the sentiment using Versamark ink. I poured white embossing powder over the sticky ink, then heat set it. This paper is a plastic paper. It will not melt with embossing but there is a significant warping with overheating which can be reversed by heating the other side of the paper. 

I added a shadow on the embossed sentiment using the Altenew Acrylic Marker. These markers have medium tips so I have overlapping of the color on some of the letters. Good thing that I used the Stamp-a-Jig. I repositioned the plastic film of the Stamp-a-ma-Jig where I stamped the sentiment over the embossed sentiment. After I aligned the letters on the Stamp-a-ma-Jig with the embossed letters on the panel, I removed the plastic film, and re-stamped the sentiment over the embossed letters using Versamark ink. I poured white embossing powder over the sticky ink, then heat set it. As always, I treated the panel with the anti-static powder before stamping.


I die cut the panel using an MFT Wonky Stitched Rectangle dies. I used the two largest dies. This plastic paper does not get cut all the way with die cutting. Not ideal but it worked for me on this project for the next step of adding white pigment ink to create the chalkboard look. Using a sponge dauber, I swiped Hero Arts Unicorn White pigment ink to the panel. 

Once I was done, I used a craft knife to separate the die cuts. I trimmed a sliver off the inner sides of the rectangular frame using a Hero Arts Rectangle Stacking die. 

I adhered the frame and the panel on a 4 1/4" x 5 1/2" red cardstock using a strong double adhesive tape to flatten the plastic paper. I added a gem to the crown.


I hope you like today's project. Just shows that trends come and go even in crafting. Below is the link to my first chalkboard card in case you are interested to see it. 


Thank you for visiting my blog. Have a blessed, brilliant and creative day!

Maria Giselle B.

I am sharing this project at


Thursday, April 25, 2024

Not Your Typical Christmas Colors

Hello! Welcome to my blog. Today's project inspiration is from the latest Newton's Nook Designs Blog Challenge which is a color challenge. I used a NND stamp and die sets that I have acquired a while back and have been itching to color. I know that the stamp is a Christmas theme stamp and the challenge colors are spring themed but that's what makes it challenging, right? Not to forget, I made this into a swing card for more fun.

The cat is colored with Tisoy, my sister's Siamese cat, as my model. 

The stamp set & coordinating die I used on this project is the NN Newton's Stocking. I stamped the cat image on watercolor paper using Versafine Onyx Black ink. I made sure the image is dry before coloring it with Tim Holtz Distress Crayons. I colored the Christmas stocking with a plaid pattern using the colors of the challenge. I die cut the image using the coordinating die. I heat embossed the sentiment on the stocking. I used Versafine Onyx Black ink with clear embossing powder. The sentiment stamp is part of the stamp set.

For the swing mechanism, I die cut a triangle on a green patterned paper. I die cut a small circle on the center of this triangle to hold the circle foam adhesive that will make the image swing. 

I trimmed a yellow and blue cardstock at 2 1/8" x 5 1/2" for the background. I embossed this using a snowflake embossing folder. 

Thank you for visiting my blog. Have a blessed, brilliant and creative day!

Maria Giselle B.

I am sharing this creation at

Wednesday, April 24, 2024

Doodling with Stencil to Create Faux Wax Seals with a Bonus Card


Hello! Welcome back to my blog. Today's project features one of the many creative ways in using a stencil. I created faux wax seals using the Waffle Flower Wax Seal die. As much as I am fascinated with this craft, I have not invested on the supplies needed for it. I settled with the alternative way of creating wax seals with use of the die set and embossing powder.

On different shades of red cardstock, which are mostly from my paper stash, I traced the mushroom using the Blank Page Muse Cute Muhrooms Stencil. I used gold glitter gel pens with different tip sizes. I added details to the mushrooms by adding dots and lines. 


I die cut the layers of the wax seal on red cardstock. I adhered the layers together. I blended gold dye ink on the top most layer of the wax seal. To make this into a faux wax seal, I embossed the wax seal using Versamark ink and Wow! Ultra High clear embossing powder. These wax seals are now ready for use. You can adhere this on the flap of an envelope or use it to embellish your project. You can use other stamp images and die cuts in place of the mushroom as long as it fits the circular space of the wax seal die cut.

With the layered die cutting of the wax seals, I came up with all these circle die cuts. Instead of adding it to my circle die cut stash, I created a matching card for the wax seals.

I repeated the process of drawing the mushroom with the use of the stencil, and adding details to the mushrooms. I drew the mushroom on the red circle die cuts.


For the card panel, I trimmed a kraft cardstock at 4 1/4" x 5 1/2". I used a stamp from the BPM Scribble & Scratch Mixed Media Set 2 to add a subtle background to the panel. I used a kraft dye ink to stamp the image. 

I adhered the circle left over die cuts to this panel. I adhered a small x die cut in between the circles to mimic stitching in between the circles. The x was die cut on matte gold cardstock. The die I used is from Paper Smooches.

For the sentiment, I die cut this on matte gold cardstock using a die from Concord & 9th. I layered this die cut sentiment with another die cut for a bit of dimension. 


I hope you like today's project. Thank you for visiting my blog. Have a blessed, brilliant and creative day!

Maria Giselle B. 

Blank Page Muse is generously offering a 15% discount to their online store to YOU, my blog readers. Just use the code BPMMaria when you check out. Enjoy!

I am sharing this project at


Friday, April 19, 2024

Card Recipe Inspired Challenge


Hello! Welcome back to my blog. I am playing along with the Kat Scrappiness Blog challenge


My patterned paper is from an Echo Park 6x6 paper pad. I love how some patterned papers have subtle designs just like this one. I splattered some mica green paint to this paper. The paper was cut at 4" x 5 1/4".

I used the Kat Scrappiness Nesting Fishtail Banner dies for my focal area. I die cut a Doodlebug patterned paper using this die.

I die cut a green cardstock with the KS A2 Stitched Strips Craft dies to create loops for the banner. I adhered this to the back of the banner. For the banner rod, I used a straw die to cut this on a cardstock with gold washi tape adhered to it. I die cut 2 more pieces of this straw on kraft cardstock and stacked it on top of each other for some dimension. I adhered a lace trim to the bottom portion of the banner using a hot glue gun.


For the focal image, I used the KS Wok On stamp set. I stamped this on lightweight white cardstock, colored it with Copic markers, and fussy cut it leaving a white border around it. 

I embossed a sentiment from the stamp set on the banner. This sentiment stamp comes as a one liner stamp. I cut the words apart so I can fit the sentiment on the banner. I could have masked the words to achieve this look but this was the quickest way of doing it without the risk of messing up. I can always align the cut up stamps next to each other to achieve its original look.

I adhered the patterned paper to a kraft cardstock cut at 4 1/4" x 5 1/2". I adhered the banner, then adhered the colored images. I added Ranger Glossy Accents to the eyes. 

I added green sequins and gems to complete the recipe. 


I hope you like today's project. You have until the end of this month if you want to join this challenge. Have a blessed, brilliant and creative day!

Maria Giselle B.

I added below links to the Kat Scrappiness products I used on this card. There will be no additional cost to you should you decide to purchase any of these products. While you are at the Kat Scrappiness website, do check out their wide array of products especially the exclusive Kat Scrappiness products. Enjoy!


I am sharing this project at

Tuesday, April 16, 2024

Card & Envelope Set Using Digital Printed Paper (Series 4)

Hello! Welcome back to my blog. Today's project features digital images from the Blank Page Muse Digital Page with Small Calendar and Versatile Spring-themed Images 2024 April. This is the fourth of a series of card & envelope sets that I created using digital prints from Blank Page Muse. I will link the other projects at the end of this post in case you are interested to check them out.


I used the plaid paper strip for all the flaps of the envelope. I used an envelope die from The Stamp Market to create the envelope. I die cut a rectangle with a wonky stitched design on a purple paper to create a writing area for the recipient and the recipient's address, in case this card is going to be mailed. The rectangle die I used is from My Favorite Things.

I also die cut an envelope liner using a die from The Stamp Market. I used the same light weight paper I used for the envelope label. 


For the matching card, I used the other paper strip in the digital download set. I resized this so it will fit the front of an A2 note card. 

I die cut the word hello on this digitally printed panel making sure I save the negative cuts created on the letters e and o. I adhered an acetate to the back of the panel, behind the window sentiment. I adhered the negative cuts using the letters e and o as guide for placement.

I adhered foam tape to the back of the panel creating a well around the sentiment window. I poured gems to this well. I sealed this well with another acetate. 


I trimmed a 5 1/2" x 4 1/4" lavender cardstock. I embossed this using the Altenew Organic Lined 3D embossing folder. I adhered the shaker panel to this embossed panel. 


The digital download includes ephemera that can be used to embellish your projects. I cropped the three butterflies and printed it twice. I fussy cut the butterflies leaving a small border around it. I reinforced the butterflies antennae by drawing a line over the print out using a metallic gray pen to make it stand out. I lightly folded the butterflies and applied glue to the crease only. I adhered this to the shaker panel. Applying glue only to the center allowed me to lift the wings up for a dimensional look. I applied shimmer to the wings of the butterfly using a shimmer pen.


I hope you like today's project. Please enjoy the short video of this card. Have a blessed, brilliant and creative day!


Maria Giselle B.

Blank Page Muse is generously offering a 15% discount to their online store to YOU, my blog readers. Just use the code BPMMaria when you check out. Enjoy!

Links to the previous card & envelope sets in this series:


Monday, April 8, 2024

Striped Card Design Using Border Stamps


Hello! Welcome back to my blog. I am at the Blank Page Muse Blog with this striped card. Did you notice that cardstock strips are very commonly used in card designs lately? It might look tedious but I like this card design since it gives me the opportunity to use my scraps. 

I usually search the internet for color combos. Once I find the one that I like, I look through my cardstock collection for cardstock that matches the color in the combo. If you are not into this or if you just don't have the exact color of cardstock, you can either blend ink to a white cardstock or color a white cardstock with a marker. You can also blend ink to the colored cardstock to get the right shade of color. 

I used the Blank Page Muse Beyond the Border Mixed Media clear stamp set to add an embossed design to each strip of cardstock. The stamp set consists of 5 border stamps. I assigned a border stamp to a color of cardstock. I stamped the border design to the cardstock using Versamark ink. I poured Wow! White Pearl embossing powder to the sticky ink then heat embossed it. I trimmed this to create a border strip.


I love the effect of the pearl embossing powder. It adds a subtle yet elegant look to the card design. What do you think?

I adhered the strips to a scrap 4 1/4" x 5 1/2" typing paper. I made sure that the strips are butted next to each other making it look like one continuous paper when done. I die cut this using a 4 1/4" x 5 1/2" rectangle die. You can use a trimmer to do the cutting but I just like to use a die since it allows me to choose which part of my created panel to use on the card. 


I die cut the Birch Press Big Hello Sugar Script on blue vellum. The sentiment die cut is a cut created using the shadow die. Isn't that great? I love it when a product offers more possibilities than what it is intended for. I die cut two more pieces of the hello shadow, one on white vellum and one on white cardstock. I adhered the white vellum die cut on the back of the blue vellum die cut, offsetting it to create a shadow. I adhered the white die cut to the back of the vellum for some dimension.

For the additional sentiment, I embossed this on navy blue cardstock. I embossed the sentiment using white embossing powder. I used a craft knife to cut the sentiment into a narrow strip. 

I jazzed up this design with some gems and baubles. 


I hope you like today's card. There are so much possibilities with this card design. I encourage you to use those border stamps and create a striped design.

Thank you for visiting my blog. Have a blessed, brilliant and creative day!

Maria Giselle B.

Blank Page Muse is generously offering a 15% discount to their online store to YOU, my blog readers. Just use the code BPMMaria when you check out. Enjoy!

I am sharing this project at


Friday, April 5, 2024

Happy Birthday Easel Card


Hello! Welcome back to my blog. Today's card came as a challenge, believe it or not. Somehow, nothing was working right for me during the creation of this card that I was close to giving up on it. It is not really the time spent that I feel bad about. I feel bad that I keep wasting supplies specifically paper because I am not happy with how it looks or something. Whew! I am just so glad that I have overcome this creative hump. How about you? Have you had these kind of days?

My card's inspiration is my co-worker who is celebrating her birthday tomorrow. She loves pandas, thus, explain the critter.

I am also motivated by the latest Lawnfawnatics challenge on using patterned paper. I am using the Lawn Fawn Perfectly Plaid Remix 6x6 paper pad on my card. 


I used the LF Giant Happy Birthday die for the interactive portion of the card. On a top folding card, I scored the front at 2 3/4" inch. I partially die cut the sentiment, covering only the top portion of the sentiment die with the die cutting plates. This will allow the top of the sentiment stay upright while the top portion of the card front, folds. The sentiment die cut is adhered on blue vellum for some shadow effect on the bold sentiment. I also drew in on the letters using an embossing pen. I poured silver glitter embossing powder to this, then heat set it. 

The panda is a freebie mini stamp set from Lawn Fawn. I stamped this on white cardstock and blended brown ink to preserve its playful look. The cake and party hat are from the LF Party Animal stamp set. For the candle & flame, I used the bamboo and the leaf to create the lighted candle.


The tiles of the card were created using the negative die cut created by the polaroid die from the LF Selfie Frames. The frames were a bit short from the edges of the card front. I added strips of pearl blue cardstock to both sides. I added stitched details to these strips using a die from the the LF Stitched Borders die.

The card front stands upright pretty well by itself but I decided to add a stopper. I die cut one of the plaid papers with a die from the LF Outside In Stitched Scalloped Rectangle Stackables. I die cut an extra on scrap cardstock and adhered this to the back of the scalloped patterned paper die cut for some dimension.

I die cut a banner on a light blue cardstock using a die from the LF Flippin' Awesome die set. I heat embossed a sentiment on this banner using a stamp from the LF Party Animal stamp set. I adhered this to the scalloped patterned paper die cut. I adhered this on the lower portion of the inside of the card.

I hope you like today's card. Below is a short video of how interactive this card is. Have a blessed, brilliant and creative day!


Maria Giselle B.

I am sharing this creation at